A step towards how to draw a car, video and example of an Aston Martin.

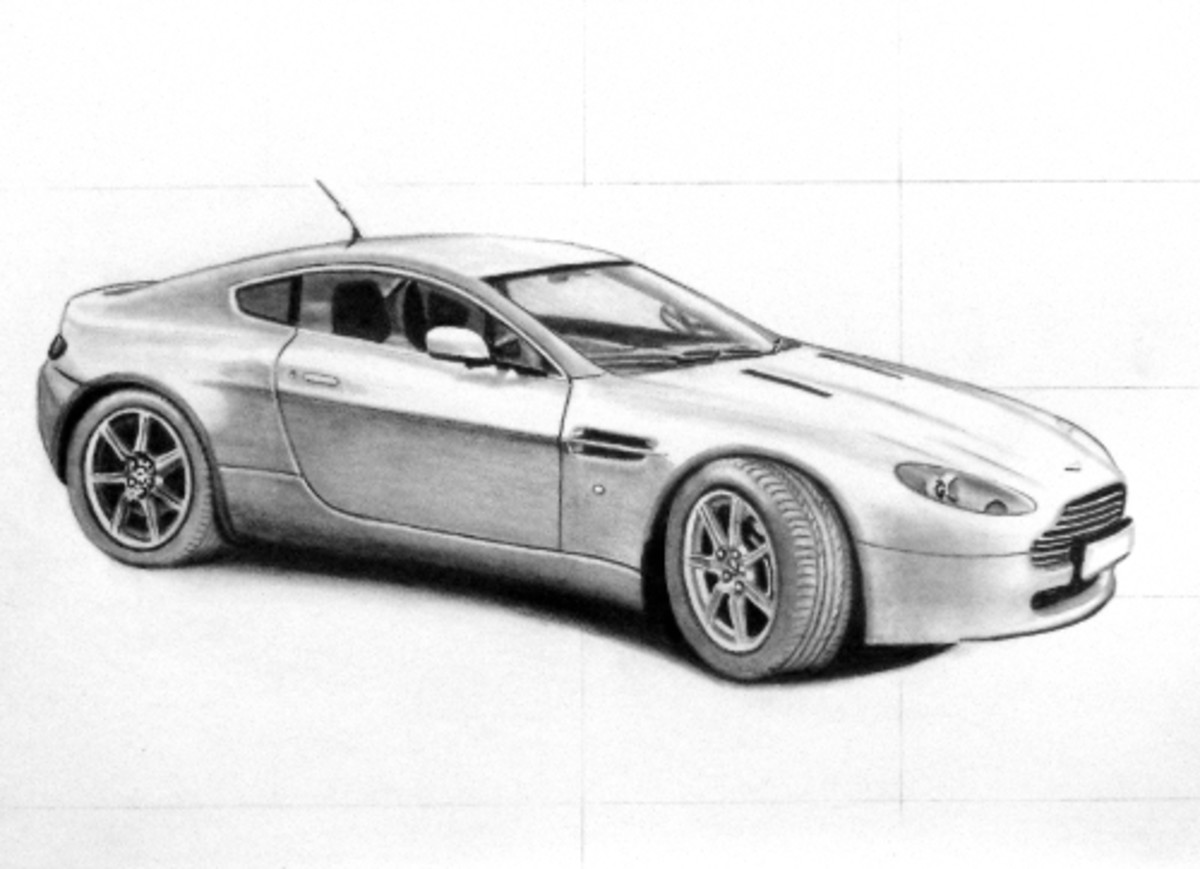
The Aston Martin, Vantage, drawing of a great British sports car.
Just in case you want to see a video of the car drawing below being drawn, then the video shows an example using the constructional grid reference guide as show
How to Draw a Car
In this demonstration on how to draw a car, I have decided to draw a great British sports car, the Aston Martin Vantage, the same car manufactures that make many of the cars featured in 007 James Bond films.
The following information will help you to draw any car but remember, all cars are not the same, so you will need to adapt your drawing skills to suit but to be honest that's the very best part of drawing, no two drawings are the same.
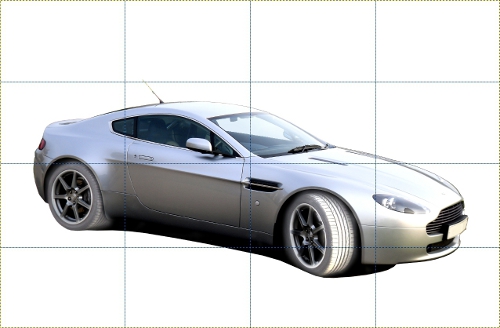
The answer to making your cars look really good and life like, is to first get your construction drawing accurate, to do this you need to first make sure that you have a really good picture to copy from.
Second you need to use a drawing grid as a tool to enable you to get your drawing accurate. I have been drawing for at least 40 years and although I can draw very accurate drawings, free hand without a grid, I cannot get the same level of accuracy that I can with a drawing grid. Nobody can with something as linear and very precise like a car, even with a drawing grid it is difficult to get it perfect, honestly.
Thirdly use a good variety of differing tones, from back to the lightest grey, and the white of the paper, this is what will make your drawing look three dimensional.
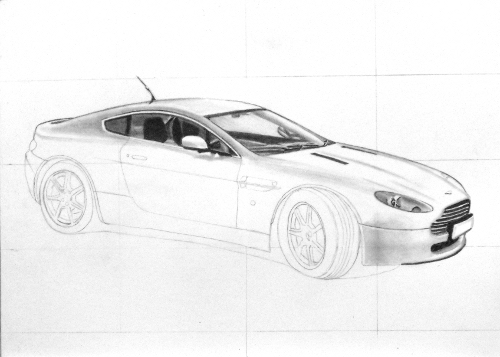
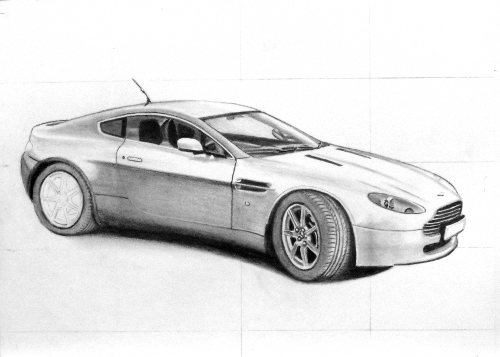
how to draw a car, Aston Martin Vantage, sports car with Construction Grid.
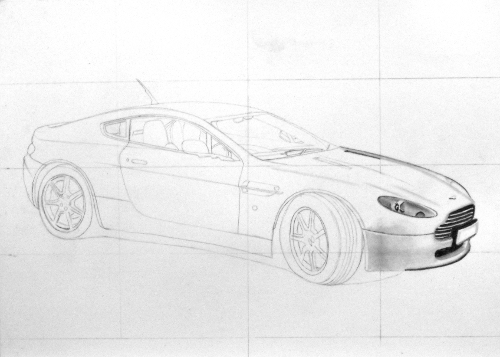
The drawing above of the car outline.
The drawing was drawn using a drawing grid, you do this by equally dividing the image you are using, as your reference for the drawing, up into a grid. I used a four by four grid but I would advise you to use a ten by ten grid. I say this because it will make your grided areas smaller, making it more easy to get your drawing accurate.
Measure your image across the top and divide that number by ten, then do the same with the side of your image. Then mark out your image along the top and down the sides, so you can draw your grid over the image accurately, with a straight edged ruler. Then do the same onto your drawing area, where you want your drawing to be, making sure they are both in proportion to each other.
Do not draw these lines with a hard pencil, like any of the H range or a HB pencil. Use a soft 3B or 4B pencil to draw these lines on your drawing area and do not press hard. If you do press hard, you will make groves into your paper and these will be very difficult to cover when you are doing your shading, leaving little white white lines, that are difficult to cover spoiling your finished drawing.
You have been warned about this, so please take it seriously.
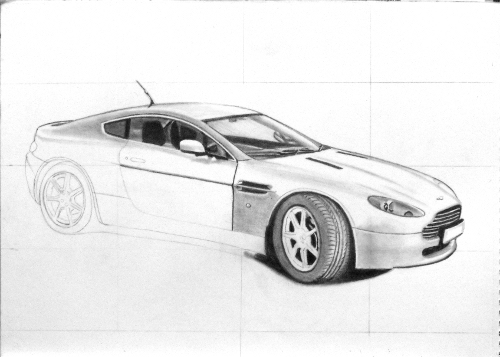
Step by step images showing how to draw this car.

Starting out drawing from the front of the car.
In the drawing above I have started out from the front of the car but this is not really a preference for drawing from the front, it is really because I am left handed and always try to draw from right to left. This enables me to lean on the drawing surface without rubbing my hand into areas that are already drawn and smudging them, so not making a mess of the drawing or changing the work that I have already completed.
If you are right handed like most people, then you should really teach yourself to work in the opposite way, from left to right and top down.
I start with a 9B and a 4B pencil, which are soft blacks, increasing or decreasing the pressure placed on them, to produce darker or lighter tones. You will see that the grill is black, where as the other areas are lighter grey and white. I then smudge these areas where necessary, with a home made smudging stick, to blend them into the white of the paper depicting the more subtle details.
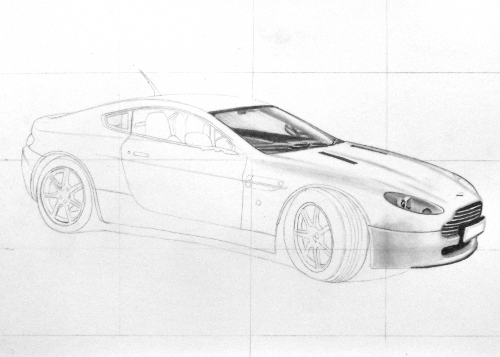
The front grill and detail of the car.
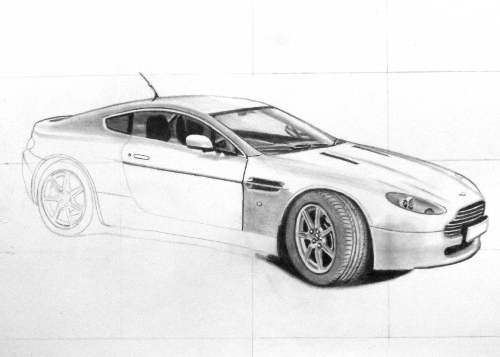
Drawing the car from the top down.
The reason for drawing the top portion of the car first is the same as already mentioned, it helps to keep from smudging parts of your drawing, that you have already completed, with your drawing hand. This is also aided by being able to do the drawing, one box at a time through the use of a grid, ordinarily if I was drawing free hand, without a grid, then I would move around the drawing, comparing and balancing the elements of it but with a grid, I do not have to do this.
As you can see I have completed the windshield area using the 4B and 9B pencils, then doing some smudging and blending with my paper smudge stick. I have also used a putty rubber to lift some of the pencil off the windshield on the far edge, to create the impression of light being reflected from off it, this helps to create a more realistic looking drawing.
Moving along the top portion of the car drawing from the right.
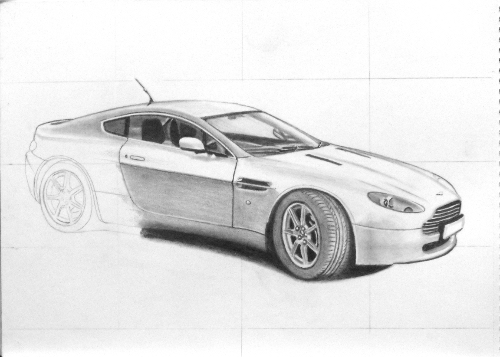
Some tones create with just the smudging stick.
The side windows and roof have been again completed with the 4B and 9B pencils, to create the darkest tone along with mid tones, the mid tones are mostly created with the smudging stick by blending the pencil marks.
When a smudging stick has been used for a while, it picks up and retains much of the graphite that has been worked in your drawing, making it into a nice drawing tool, that will create nice light tones and mid tones without using any pencil at all. Depending on how hard you press or lightly you press, when using the stick, will produce different lighter or darker tones of blended graphite in your drawings.
The top portion of the car drawing completed.
Making a start on the wheels.
I first draw the side vent and body line of the car, with a B grade 0.5 mechanical pencil, these are very fine tipped pencils, so you can work the small delicate details more easily and accurately.
Then using a HB graphite stick on its side, so as to utilize the full length of the graphite tip, I lightly fill in the area around the side vent, to be blended with my smudge stick. The smudge stick blends out the graphite to a medium dark tone. Then I draw the detail of the dark area around the tire with a 9B graphite stick, to make this area as black as possible, also filling in the areas between the spokes of the wheel and putting in one of the darker lines running around the far side of the tire.
Front side and wheel beginnings.

Drawing the tread and details of the tire at the front of the car.
I use a 9B graphite stick to draw in the groves of the tire tread and the dark line around the outer rim of the wheel, which is then blended with my smudging stick, lightening the dark lines and spreading them out to create the medium dark tone of the tire its self. I then put greater emphasis on the tread of the tire with my B grade 0.5 mechanical pencil to make the details more pronounced.
Detailed drawing of the cars front tire.
The front wheel details are very important.
When drawing cars it is important to get the wheels very accurate, as they will make or brake your drawing, many car designers sketches do not show completed wheels in their the drawings because they are difficult and time consuming.
These details are first drawn with the B grade 0.5 mechanical pencil very lightly, so as to make them as accurate as possible before committing myself to making these elements darker and more defined, later with a 4B graphite pencil.
Final details of the front wheel of the car.
The darker area along the door panel.
I first use the 4B graphite pencil to create the darker area below the door line, then with the HB graphite stick on its side to use the full length of the tip, to shade this area because it is really two different tones, a darker mid tone and a mid tone together. I then blend them both together with my smudging stick, to make them more even and natural looking.
Then I redraw the lines emphasizing the door and the welded seams between the body panels with my 9B pencil, to finally highlight the line by lifting out the graphite below the line, with my battery operated eraser. This reveals the highlight created by the curved metal folded back along the seam, you will see this better in the finished drawing at the end of this page.
Blended mid tone below the door line.
Blending on rear panel and tire.
Again most of the rear panel is shading is created with only the smudging stick being used, there are a few lines created with the 4B pencil that are blended with the stick but because of the high deposits of graphite on the stick, there is no need to use much pencil. The darkest area around the tire in the tire well, are made with the 9B pencil and the shadow underneath the car, along with the body line being emphasized more.
I also use the B grade mechanical pencil to do the detail on the tire tread and draw around the rim of the wheel with the 9B pencil before blending the tire with the smudging stick, to make the tire a darker mid tone.
You will notice in the video that I have to remove parts of the rear tire well with the battery operated eraser because they are just a little bit inaccurate and this had become clear, when I had put the darkest tone into the tire well, this happens sometimes, so don't be afraid to correct these details, otherwise you will not achieve a good finished drawing.
The rear side panel and tire.
The details on the rear wheel.
To do the final details on the rear wheel I go back to using the B grade, 0.5 mechanical pencil, first drawing light marks and then making them darker, more pronounced, wheels always have lots of small details, that need to be very accurate, otherwise they will not look good.
You need to spend a lot of time doing wheels because they are intricate and difficult to get to look right, plus if they are not, your car drawing will not look as good as it could.
The rear wheel details to almost finish the car drawing.
Equipment used to compleate this drawing of an Aston Martin Vantage sports car.
A home made smudging stick or blending stump as they are sometimes called, I make my own out of computer printing paper by rolling it up tightly into a cone shape and then fastening it in the middle with some sticky tape.
A battery operated eraser, these are quite cheap to buy and work really well in many ways, they remove the graphite really well, and don't seem to damage the paper as much as a normal hand held eraser would. They are also great for creating fine highlights or very intricate marks and details. I used it to make small highlights in the tread of the tires and could not successfully do this any other way.
Putty rubber or neadable eraser as they are also called and a normal hand held plastic eraser.
HB, 4B, 9B graphite pencils and graphite sticks, graphite sticks are solid pieces of graphite just like a pencil but completely graphite, with no wood, just coating to stop the graphite rubbing onto your hands and making a mess.
An 0.5 B grade mechanical pencil.
A3 water color paper pad heavy duty 300 GSM paper.
I hope you have found this instruction informative and all the very best with your own attempts at how to draw a car in the future.
Thank you for reading and taking a look at this information and if you have any question or want to leave a comment please do below.
Finally the last small but important details.
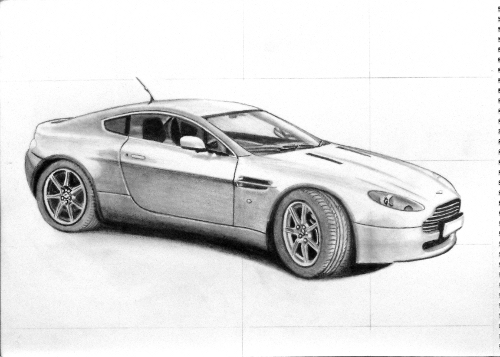
The finished car with small details finished.
I fill in the rear light and put some high lights onto the tires by lifting out some of the graphite with the battery eraser. Then blending the hard edges of the light areas with a putty rubber that has been shaped to only lift out from the edges of these marks. The putty rubber is dabbed and dragged over the area so as to only remove small amounts of graphite, to create the blending effect.
I always take a break after finishing a drawing to give myself a rest and then go back to have another look at it from a distance, where I can always find little details that need some more work or a little more blending of some of the pencil marks.
Another good way of taking a more detached view of your drawing is to take a look at it in the mirror, as this will reverse the drawing and often give a different perspective on it, revealing any potential issues. Why this works so well I do not really know but I do this always, when I think a drawing is finished, just to be sure and you will be surprised at how well it uncovers unseen problems in your work.
More information about how to draw a car can be seen at the links below please enjoy, open them up in new tabs so that you don't forget to take a look or you wi
- How to draw a car step by step, Mustang Shelby GT500 with marker pens and pencil.
See this page and video about drawing cars, giving an example of drawing a Shelby Mustang, GT500, from a detailed construction drawing, you can see it being drawn using marker pens. - Drawing Cars, Mustang 1968 Shelby GT 350, Music, Reverbnation The Masterbakers - YouTube
Drawing of a Shelby GT350, 1968 model, see this fabulous classic being drawn with marker pens and watch it unfold right in front of your eyes. - Drawing Cars, Shark, Ugly by The MasterBakers - YouTube
This is a concept drawing that is still ongoing, I am happy with this one but I do feel there is still a log ways to go, watch this idea growing on the screen. - Drawing Cars, Scirocco VW Concept Car, With Marker Pens & Pencil - YouTube
I used Touch, twin tipped marker pens to create this drawing on 300 gsm watercolour paper and a HB mechanical pencil; it took me 2 hours start to finish once... - Drawing Cars, How to draw tires that good - YouTube
In this video I use a drawing of a Shelby GT500 Mustang to give you some tips on drawing wheels and tires well, useful information to help you improve your drawings.


